Malware and viruses are a constant threat to our computers and laptops. It is important to keep our system clean as it affects the functioning of the various programs. And thus antimalware or antivirus is used to protect our devices from external threats like data stealing. Now coming to the point, the MsMpEng.exe is an antimalware software, which is part of the Windows Defender. Though it is an excellent antivirus program, there have been complaints about MsMpEng.exe CPU usage issue. So today we will be giving you an insight into what is MsMpEng.exe and everything related to the MsMpEng.exe high CPU usage problem.
What is MsMpEng.exe?
MsMpEng.exe is the cruical part of Windows Defender. It serves as an anti-spyware utility tool which scans all the downloaded files and software to find whether there is any malicious program (virus) present in it. In case, if it finds any spyware then it can remove or quarantine it. Since it plays an active role in preventing spyware downloads by using trojan and worm programs. Thus, terminating the MsMpEng.exe can cause serious security issues.

Due to the high usage problem of MsMpEng.exe, one can opt for some different antivirus program. But if you want to continue with Windows Defender, then you can either disable it to resolve the MsMpEng.exe high disk usage issue or check out some more ways to troubleshoot it.
Fix MsMpEng.exe High CPU Usage issue
There are a lot of reasons which causes this unusual behavior of Windows Defender. Some of them are:
- Low hardware resources
- The program might be scanning its directory
- Registry files of old antivirus program
- Your computer might have installed malware
Method I: Disable or Turn off Windows Defender
Step 1: Open Run Command, now type gpedit.msc and hit OK.

Step 2: Then the Local Group policy Editor window will open. Just simply Go to Local Computer policy -> Computer configuration -> Adminstrative Templates -> Windows components -> Windows defender

Step 3: Click Windows defender then you can see the below window in the right hand area. Now Find “Turn off Windows Defender” and Double-click it
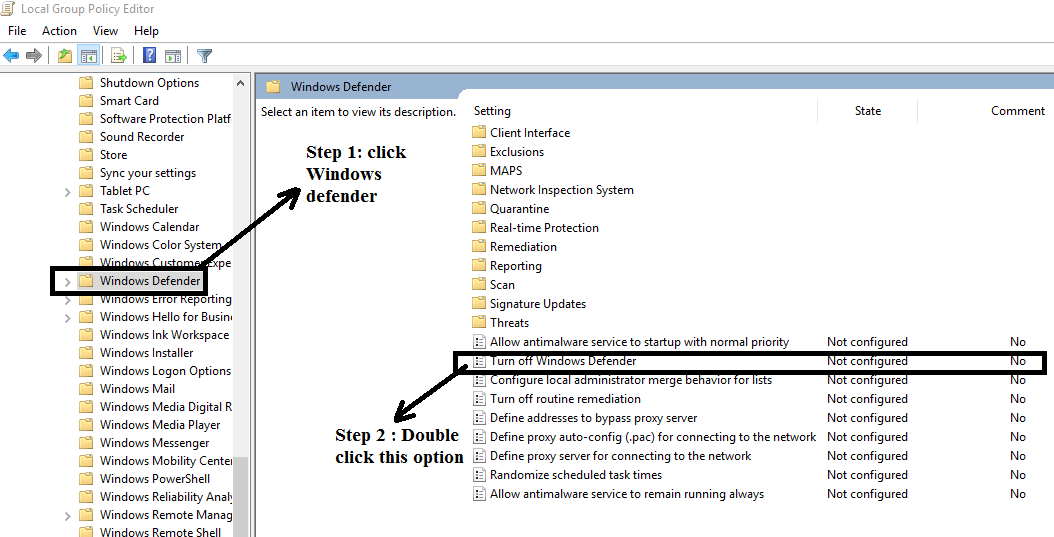
Step 4: Now a window will pop up, in that choose the radio button “Disabled”, and hit “OK”.

Method II: Prevent Windows Defender from Scanning its Directory
If you are facing the MsMpEng.exe high CPU usage issue, then the first thing that you should do is to avoid the file from scanning. Just follow the below steps carefully:
Steps to be followed by Windows 10 users
Step 1: Open the Windows Defender ( which is nothing but Microsoft Security Essentials) on your PC. As the app opens, click on the Settings option.

Step 2: Then the settings window appears, Scroll the window and find Exclusion in the right pane and click on “Add an exclusion”

Step 3: After that, you need to choose the “Exclude a File” Option from the below shown window.

Step 4: Now, the below window appears, then in the File name search bar just type “MsMpEng.exe” and click exclude this file option.

Pro Tip :
- For Windows 10 & 8 users, the file location will be – C:\Program Files\Windows Defender\ MsMpEng.exe
- For Windows XP, 7 and Vista users, the file location will be – C:\Program Files\Microsoft Security Client\ MsMpEng.exe
Step 5: As Soon as you hit the Exclude this file option, the file will be excluded and shown as below.
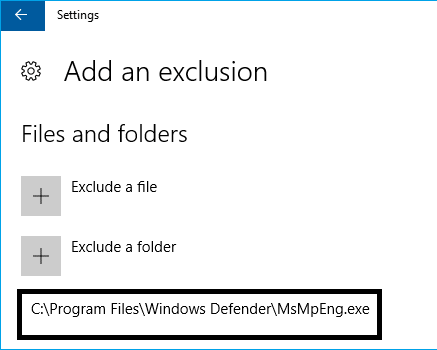
Step 6: As the final step you need to restart the computer, and your problem will be solved shortly after the file gets deleted.
Steps to be followed by Windows 7 users
Step 1: Open Windows Defender from the search bar
Step 2: Select Tools option, Click “ADD” button beside the “Do Not Scan these Files or Locations:”box.
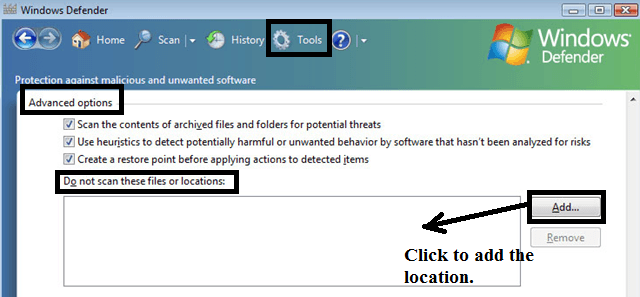
Step 3: Now Add the Following location c:\program files\windows defender
Step 4: Click OK and hit Save button in order to apply changes made.
Also Read: How to Create Guest account on Windows 10
Method III: Limit the CPU Usage
The users who are facing the MsMpEng.exe high CPU usage issue in windows 10 or 7, can try this method of limiting the CPU usage. It can be done by following the given steps. We have provided the process to limit the CPU usage for both Windows 10 and Windows 7 users separately.
Steps that must be followed by Windows 10 users
Step 1: Go to Start menu search bar, and type task manager, then click on it to open.

Step 2: When the task manager app opens, go to the details tab and Find MsMpEng.exe and right click on it to select Set Affinity and choose the CPU Limit

Steps that to be followed by windows 7 users
Step 1: Open the Task Manager app.
Step 2: Now go to the Processes tab and choose MsMpEng.exe and right-click on it.
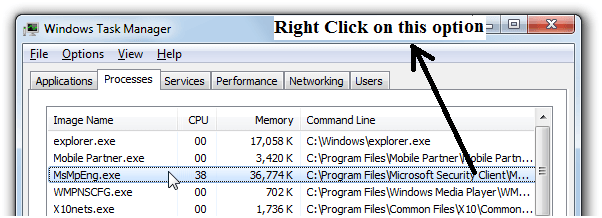
Step 3: Select Set Affinity from the menu and choose the CPU limit.
Method IV: Start Your Computer in Safe Mode
The MsMpEng.exe antimalware service executable, but results in high CPU usage. Thus it is our job to check and remove any malware present on our computer. To scan your devices for malware, start your computer in safe mode with networking. Enter the safe mode through the following steps.
Steps to be Followed by Windows 10 Users
Step 1: Go to start menu, open Settings.
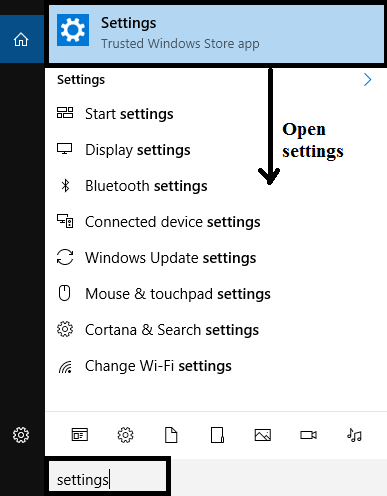
Step 2: Then Choose Update & Security.
Step 3: After that, Select the “recovery option”.
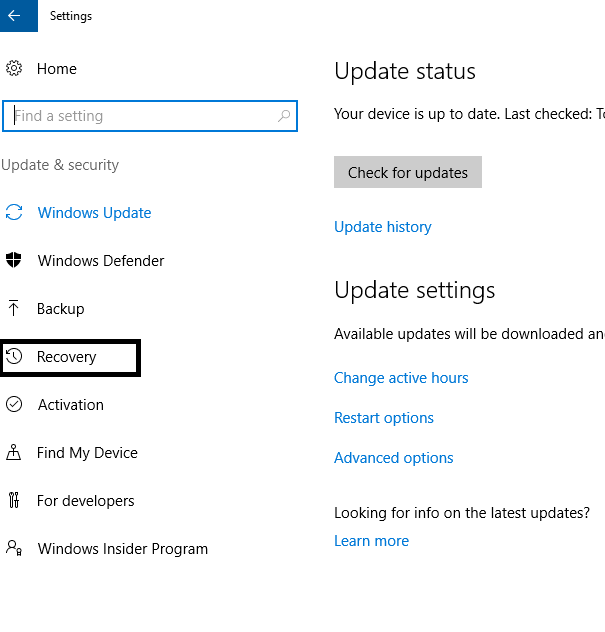
Step 4: The following window appears, now in the Advanced startup section, and choose Restart now.

Steps to be followed by Windows 7 Users
Step 1: Close all the Running programs and reboot your system.
Step 2: Press the F8 key while the computer is on a reboot. Keep the F8 key pressed until the logo of Windows is seen on the screen.
Step 3: Soon you will see a black screen. Now click on the Safe Mode with networking option under the Windows Advanced Options Menu.

Step 4: By doing this you will be able to enter the Safe mode in Windows XP, Vista and Windows 7 with networking.
Method V: Reschedule the Scanning Time of Microsoft Security Essentials
Steps to be followed by Windows 10 users
Step 1: Go to the search bar, type Task scheduler and open it.
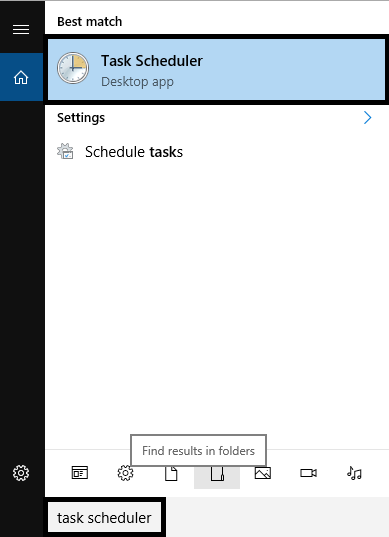
Step 2: In the Task scheduler window, Go to the left pane and select Task Scheduler(Local)-> Task Schedular Library-> Microsoft-> Windows-> Windows Defender.

Step 3: After selecting the Windows Defender, In the right pane, Double-click the “Windows Defender Scheduler Scan”.
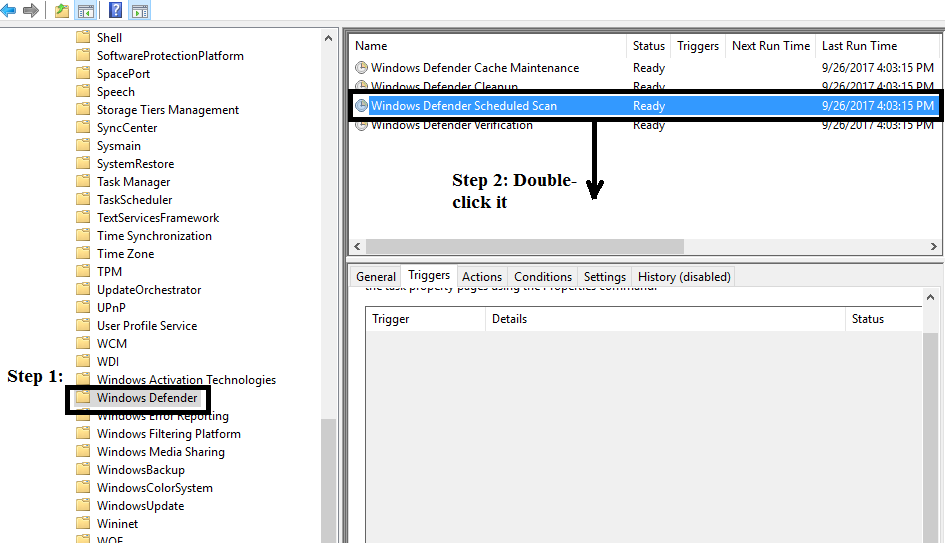
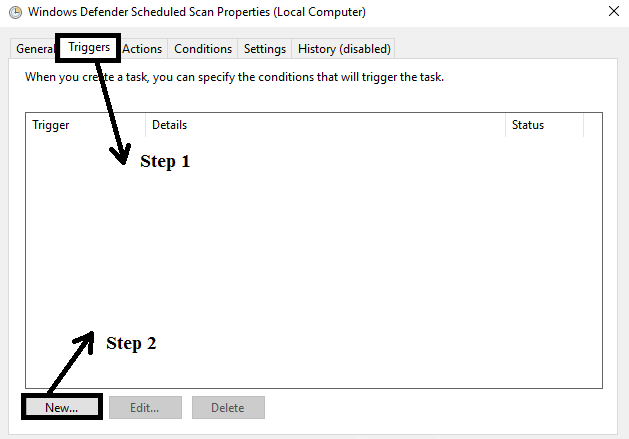
Step 4: Then a window will pop up, just go to “Triggers” tab and click on “new”.
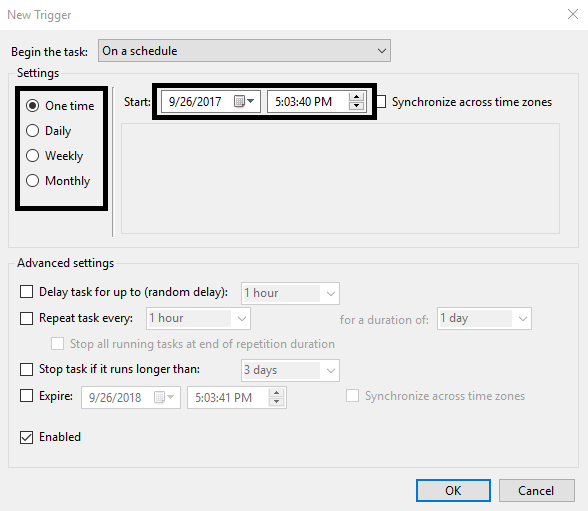
Step 5: Now, you can schedule the windows defender at what ever date and time you want, and click on “OK”.
Steps to be followed by Windows 7 Users
Step 1: Open Windows Defender or Microsoft Security Essentials on your PC and then click on Settings.
Step 2: On the left-hand side, click on Scheduled Scan.

Step 3: On the right-hand side, you will be allowed to make changes in the time and date of the scanning process.
Step 4: Click on Save Changes option in order to apply changes.
Step 5: Check if the MsMpEng.exe anti-malware service executable issue of high CPU usage has been resolved.
Method VI: Remove Adware
Adware is software that downloads malicious programs and software automatically while a person is working online which causes the issue of MsMpEng.exe antimalware service executable. So to remove such adware I have listed the two best and efficient adware removing programs. They are as follows:
- AdwCleaner: This software is compatible with Windows7, 8 and 8.1 along with Windows Vista, XP and Windows 10. So now you can fix the MsMpEng.exe Windows 10 issue.
- Malwarebytes: This software program works to remove adware, spyware, malware and even the anti-rootkit tech.
In place of installing some adware remover, one can also fix the MsMpEng.exe Windows 10 or 7 issue by installing some other antimalware program.
The security, as well as the efficiency of your system, is in your hands. By installing an antimalware program, your work doesn’t finish as these antimalware might protect your PC or laptop from virus and other malware, but they might also be affecting your computer’s efficiency to work. The MsMpEng.exe antimalware service executable high CPU usage issue is one of them. So if you become a victim of such a problem, then it is advised that you use of any of the above-given methods and rise against the threats.

This is a very useful article. It saved my laptop from crashing through huge disk I/O. Thanks!
Fixed my issue with the help of this article. Thanks. Can you please share how to download latest mouse Drivers?